So you want to make a cool web game but don’t know how to code? Let me say, creating a web game might sound hard, but it’s simpler than you think. With just your favorite Chatbot and Replit, even beginners can create fun games like 2048. In this guide, I will show you how to build a basic math puzzle game step-by-step. Even if you have zero coding experience, by the end, you’ll have a game you can play and share with others. Let’s get started!
Step 1. Setting Up Your Tools
What You Need:
- Claude 3.5 Sonnet: Your AI assistant for coding ideas and support. Personally I prefer Claude when generating code, but you can also use your fav like ChatGPT or why not using both in USnap😁

- Replit Account: A platform to host and test your game.

Getting Started:
- Sign Up for Replit: Visit the website and create an account if you don’t have one. Log in if you already do.
- Access Claude 3.5 Sonnet: Make sure you can use your favorite model for brainstorming and coding help.
Step 2. Brainstorming Game Ideas with Claude Sonnet
Now that your tools are ready, let’s come up with game ideas. Use Claude to help you brainstorm. Here’s an example prompt:
I'm keen on developing a basic web-based number puzzle game, similar to the popular 2048 game. I plan to use HTML, CSS, and JavaScript for the game's development. The core gameplay should revolve around merging numbers or tiles to form larger numbers or tiles. Could you help me brainstorm some ideas for this type of game?

You can see that Claude will respond with various suggestions. Now go ahead and choose an idea that sounds fun and doable. For this guide, we’ll use a game called Power Merge where players slide tiles to combine numbers. You can always add more features later.
Pro Tip: When picking a concept, choose one that you understand well. This will make coding and problem-solving easier as you go.
Step 3. Defining Web Game Mechanics
Now that you have your game idea, you need to define how it works. Use Claude Sonnet again to clarify the game mechanics. Here’s a prompt:
Let's dive deeper into the 'Power Merge' game concept. The basic idea is to move numbered tiles on a grid. When two tiles of the same number collide, they merge into a tile with a doubled value. A new tile appears after each move, making the board progressively more crowded.

To add an extra layer of strategy, we'll introduce special tiles:

x2 Tiles: When combined with other tiles, they double the resulting sum.
-1 Tiles: These tiles reduce the sum of the combined tiles by one.
The ultimate objective is to reach a specific target sum before the board fills up completely.

Can you explain how this gameplay would work in more detail?


But for initial version, I want to make it simple and just focus on getting the basic tile movements. Then, I could merge logic working before adding extras. Here’s the follow-up prompt:
That's great, but for our initial version, let's just focus on the core mechanics of moving tiles and combining numbers without any special tiles. Can you give me a simplified version of the rules for that?

Step 4. Generating the Game Code
With the rules defined, it’s time to bring your game to life by writing the code. Don’t worry if coding feels daunting, Claude Sonnet can provide step-by-step guidance and even write sections of code for you.
You can use this prompt:
Can you provide the complete HTML, CSS, and JavaScript code for a simple version of our game? I plan to host this code on Replit. This version should include a 4x4 grid and basic functionality for moving and merging tiles.Then it provide us with three separate code files:
1. HTML (index.html)
<!DOCTYPE html>
<html>
<head>
    <title>Power Merge</title>
    <link rel="stylesheet" href="style.css">
</head>
<body>
    <div class="container">
        <h1>Power Merge</h1>
        <div class="score-container">Score: <span id="score">0</span></div>
        <div class="grid-container">
            <div class="grid"></div>
        </div>
        <div class="game-message">
            <p>Use arrow keys to move tiles</p>
            <button onclick="startNewGame()">New Game</button>
        </div>
    </div>
    <script src="script.js"></script>
</body>
</html>
2. CSS (style.css):
.container {
    width: 400px;
    margin: 0 auto;
    text-align: center;
}

.grid-container {
    background: #bbada0;
    padding: 10px;
    border-radius: 6px;
    width: 400px;
    height: 400px;
    margin: 0 auto;
}

.grid {
    display: grid;
    grid-template-columns: repeat(4, 1fr);
    grid-gap: 10px;
    background: #bbada0;
    padding: 10px;
}

.cell {
    width: 80px;
    height: 80px;
    background: rgba(238, 228, 218, 0.35);
    border-radius: 3px;
    display: flex;
    justify-content: center;
    align-items: center;
    font-size: 24px;
    font-weight: bold;
    color: #776e65;
}

.tile {
    background: #eee4da;
}
3. JavaScript (script.js):
let grid = [];
let score = 0;
const gridSize = 4;

// Initialize the game
function initGame() {
    // Create empty grid
    for (let i = 0; i < gridSize; i++) {
        grid[i] = [];
        for (let j = 0; j < gridSize; j++) {
            grid[i][j] = 0;
        }
    }

    // Add initial tiles
    addNewTile();
    addNewTile();
    updateDisplay();
}

// Add a new tile to a random empty cell
function addNewTile() {
    let available = [];
    for (let i = 0; i < gridSize; i++) {
        for (let j = 0; j < gridSize; j++) {
            if (grid[i][j] === 0) {
                available.push({x: i, y: j});
            }
        }
    }

    if (available.length > 0) {
        let randomCell = available[Math.floor(Math.random() * available.length)];
        grid[randomCell.x][randomCell.y] = Math.random() < 0.75 ? 1 : 3;
    }
}

// Update the display
function updateDisplay() {
    const gridContainer = document.querySelector('.grid');
    gridContainer.innerHTML = '';

    for (let i = 0; i < gridSize; i++) {
        for (let j = 0; j < gridSize; j++) {
            const cell = document.createElement('div');
            cell.classList.add('cell');
            if (grid[i][j] !== 0) {
                cell.classList.add('tile');
                cell.textContent = grid[i][j];
            }
            gridContainer.appendChild(cell);
        }
    }

    document.getElementById('score').textContent = score;
}

// Move tiles in specified direction
function move(direction) {
    let moved = false;
    let merged = Array(gridSize).fill().map(() => Array(gridSize).fill(false));

    // Define movement patterns
    const movements = {
        'ArrowUp': {x: -1, y: 0},
        'ArrowDown': {x: 1, y: 0},
        'ArrowLeft': {x: 0, y: -1},
        'ArrowRight': {x: 0, y: 1}
    };

    const move = movements[direction];

    // Determine iteration direction
    const iterate = (direction === 'ArrowDown' || direction === 'ArrowRight') ?
        {start: gridSize - 1, end: -1, step: -1} :
        {start: 0, end: gridSize, step: 1};

    for (let i = iterate.start; i !== iterate.end; i += iterate.step) {
        for (let j = iterate.start; j !== iterate.end; j += iterate.step) {
            if (grid[i][j] !== 0) {
                let newI = i;
                let newJ = j;

                // Move tile as far as possible
                while (true) {
                    let nextI = newI + move.x;
                    let nextJ = newJ + move.y;

                    if (nextI < 0 || nextI >= gridSize || nextJ < 0 || nextJ >= gridSize) break;

                    if (grid[nextI][nextJ] === 0) {
                        grid[nextI][nextJ] = grid[newI][newJ];
                        grid[newI][newJ] = 0;
                        newI = nextI;
                        newJ = nextJ;
                        moved = true;
                    } else if (grid[nextI][nextJ] === grid[newI][newJ] && !merged[nextI][nextJ]) {
                        grid[nextI][nextJ] *= 2;
                        grid[newI][newJ] = 0;
                        merged[nextI][nextJ] = true;
                        score += grid[nextI][nextJ];
                        moved = true;
                        break;
                    } else {
                        break;
                    }
                }
            }
        }
    }

    if (moved) {
        addNewTile();
        updateDisplay();
    }
}

// Handle keyboard input
document.addEventListener('keydown', (event) => {
    if (['ArrowUp', 'ArrowDown', 'ArrowLeft', 'ArrowRight'].includes(event.key)) {
        event.preventDefault();
        move(event.key);
    }
});

// Start new game
function startNewGame() {
    score = 0;
    initGame();
}

// Initialize the game when the page loads
window.onload = startNewGame;
These are just snippets, but Claude provides us with the complete code files for our initial version of “Power Merge“.
Step 5. Hosting Your Game on Replit
With your game coded, it’s time to test and host it. And Replit makes this easy, so you can see your game in action quickly.
Setting Up a Project on Replit:
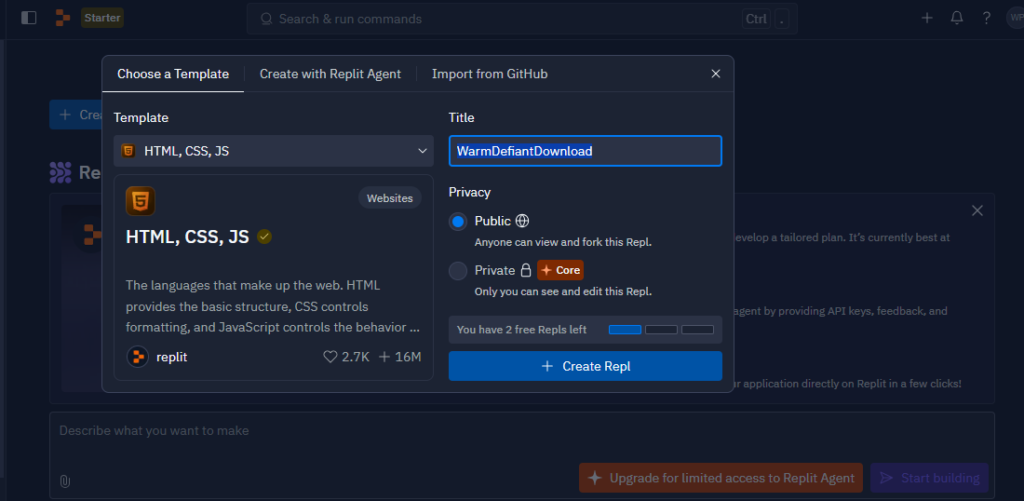
- Log in to Replit and click the “+” button at the top-right corner
- Choose “HTML, CSS, JS” from the menu and name your project “Power Merge”.
- Click “Create Repl”. to set up your workspace.

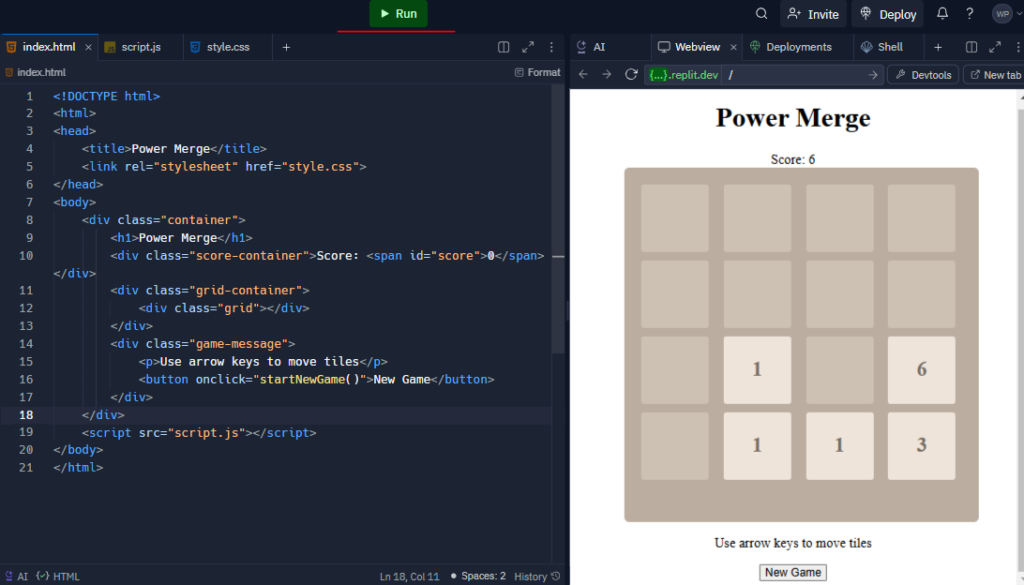
Adding Your Code: Copy and paste your HTML, CSS, and JavaScript code into the files in Replit.
- Copy the HTML code and paste it into the
index.htmlfile in Replit. - Copy the CSS code and paste it into the
style.cssfile. - Copy the JavaScript code and paste it into the
script.jsfile.

Debugging Tip: If something doesn’t look or behave as expected, use the console to identify issues.
Now let’s click “Run” to see your game appear in the Webview pane.

Now that your game is hosted and playable, you can use your mouse or keyboard to swipe the tiles around and see how the game mechanics work. I just play it and get 122 points like this😁

Publishing your game is the final step, and it’s easier than you might think. To share your game, click on “Invite” button like this:

Pro Tip: Add a README file to your GitHub repository to explain how the game works and provide instructions for playing.
You can play my Power Merge game here.
Ready to show off your work?
Just by following this guide, you’ve learned how to brainstorm ideas, write code, host your game, and share it online. Start small and gradually add new features to keep learning and improving your skills.
Share your game with friends, get feedback, and keep experimenting with new ideas. The more you practice, the better you’ll get. Who knows? This could be the start of an exciting new hobby or even a career in web development. Good luck!
